How to setup NGINX reverse proxy with automatic Lets Encrypt SSL Certificate Generation on Docker for a Ghost blog
Learn how to set up an NGINX Reverse Proxy with automatic Letsencrypt Certificate Generation for your own Ghost blog using your own domain name using Docker Compose

Overview
For our Ghost blog to talk to the web we will first need to set up the NGINX Reverse Proxy and the Lets Encrypt Companion containers using docker and docker-compose.
Setting up NGINX Reverse Proxy with SSL
The NGINX Reverse Proxy, which we're going to run in a Docker container is the main component that sits as the gatekeeper to the outside world. Its job is to listen on external ports 80 (HTTP) and 443 (HTTPS) and direct incoming requests to the correct container service without directly exposing what's going on inside your VPS.
The SSL companion Docker container, which we're going to be running in tandem with the NGINX reverse proxy automatically redirects all connections from HTTP to HTTPS and handles SSL encryption for all traffic, acting as a demarcation point. This container will also process certificate generation via the use of Letsencrypt for any domains that you start a docker container with automatically.
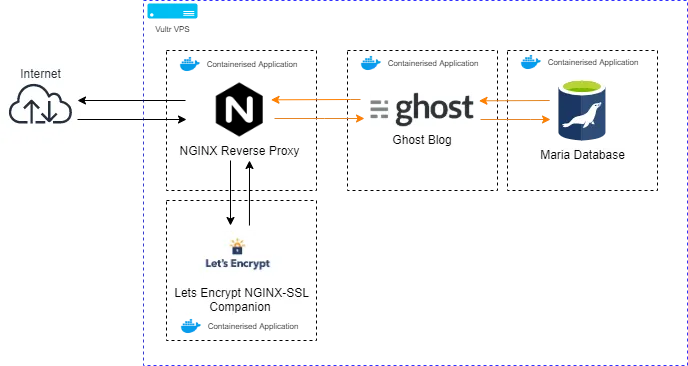
As you can see we're dockerising every different function that we require. For this part of the guide lets dockerise just the Reverse Proxy and the NGINX-SSL companion components
Let's first create our folder structure which will house the docker-compose files for the two services we're about to spin up on our VPS.

Login to your VPS and substitute your user for the one we created earlier.
su akgEnter into the users home folder by typing
cd /home/akgNext, let's create a proxy folder
mkdir proxyInside the proxy folder, we now need to create our docker-compose.yml file. This is a file that is written in Yaml which will define what docker containers we want to run.
cd /proxy
nano docker-compose.ymlFor this docker-compose.yml file, I've used the Jwilder/nginx-proxy and the nginxproxy/acme-companion file images which are both publicly available and regularly updated.
version: '2'

services:
  nginx-proxy:
    image: jwilder/nginx-proxy
    container_name: nginx-proxy
    ports:
      - "80:80"
      - "443:443"
    volumes:
      - conf:/etc/nginx/conf.d
      - vhost:/etc/nginx/vhost.d
      - dhparam:/etc/nginx/dhparam
      - certs:/etc/nginx/certs:ro
      - /var/run/docker.sock:/tmp/docker.sock:ro
      - /usr/share/nginx/html
    networks:
      - proxy
    restart: always

  letsencrypt:
    image: nginxproxy/acme-companion
    container_name: nginx-proxy-le
    volumes_from:
      - nginx-proxy
    volumes:
      - certs:/etc/nginx/certs:rw
      - /var/run/docker.sock:/var/run/docker.sock:ro
    restart: always

volumes:
  conf:
  vhost:
  dhparam:
  certs:

networks:
  proxy:
    external:
      name: nginx-proxy
Yaml file for Docker-compose configuration
Once you've copied this into the file press Ctrl+ O and then select Y to save the file. To exit the nano editor hit Ctrl + X.
I've included a download for the compose.yml file below 👇
let's go into a bit of detail to understand what's going on here. From a high level, we're asking Docker to spin up two services, Nginx-proxy and Letsencrypt, define a few volumes and connect to a custom Nginx-proxy external network.
Docker-compose file
- Version is the version of the docker-compose file formatting that we're using for this file, in this case, we're using compose version 2
Nginx-Proxy
- The Image is the name of the executable package of software that includes everything we need to run an NGINX Reverse Proxy all contained within a nice file for us.
- We've defined the container_name as Nginx-proxy to assist us in identifying what container is running down the line.
- Ports 80 and 443 are forwarded onto the host (our VPS) to make the Nginx-proxy internet-facing. No other containers will need their ports forwarded as this container handles all communication
- /var/run/docker.sock from the host is mounted allowing the proxy to listen in on other containers starting and stopping on the host which allows the container to dynamically update NGINX domain traffic forwarding to new containers that spin up or are deleted on the fly.
- Various NGINX directories are mounted on the host as named volumes to keep them persistent even if the docker instance were to be deleted and recreated and are listed as either as :rw (read/write) or :ro ?(read only)
- The container is assigned to the proxy external network, which provides it access to the host's internet-facing IP address.
- The directive restart: always ensures that the container will always try and restart if you restart your VPS or it gets deleted for some reason.
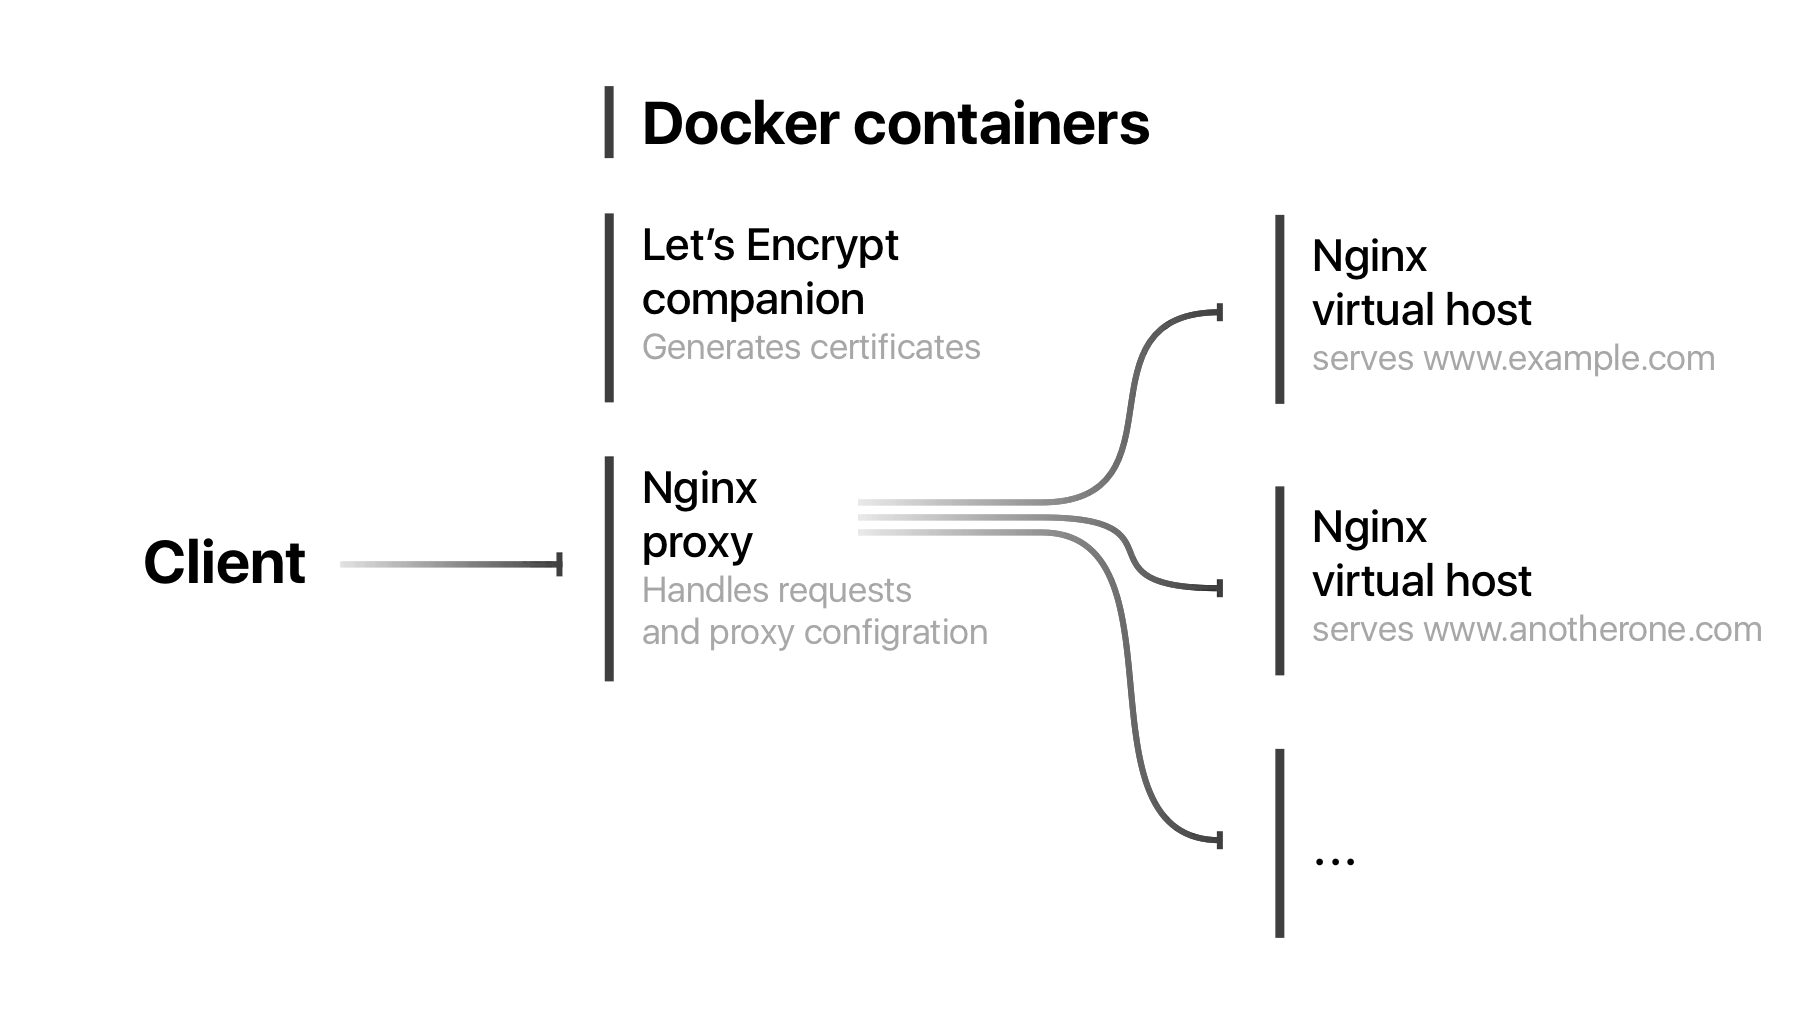
Letsencrypt
Letsencrypt is the companion container to the Nginx-proxy which handles all the necessary SSL activities including obtaining the required certificates from the Let's Encrypt service and auto-configuring the Nginx-proxy service to route the encrypted traffic to the various containers you have running on your VPS-dependent on the domain the connection is requesting.
- Letsencrypt is also connected to the /var/run/docker.sock for it to listen for new containers that are spun up or down and to get the information required to generate the SSL certificates.
- It shares its volumes with the Nginx-proxy using the volumes_from: Nginx-proxy directive as all it has to do is update configurations that Nginx-proxy is running.
- This container is not assigned to an external network
The External Network
There are a few caveats that you'll want to know about with networking on docker that is important to share as they gave me a headache when I did it for the first time:
When you create a docker-compose.yml file any services that you define as part of that file such as the Nginx-proxy and the Letsencrypt service that we've defined above will be automatically internally networked together. The reason why we are creating an external network is for the NGINX proxy to talk to the Host and receive and process requests for the domain to forward it to our Ghost blog container.
For docker to use the "proxy" network you will need to create the network manually as this is not something docker-compose can handle using the following command:
sudo docker network create nginx-proxy
Once all this is complete we can try spinning up our docker-compose file.
Make sure you're in the location of the docker-compose.yml file before executing the docker-compose up command.
cd /home/akg/proxy
Let's execute the command to tell Docker to create our instances based on our docker-compose.yml file. This may take a while as it has to download, extract and install the docker images the first time it runs.
sudo docker-compose upAppending -d will detach from the docker logs for the docker-compose.yml file.
sudo docker-compose up -dConfirm the two docker containers are running by using the following command:
docker psConclusion
Okay great, you've successfully installed NGINX with Lets Encrypt that will automatically forward HTTPS requests to the correct container and grab a domain certificate for each new container.